Cebek Starter Pack Picaxe-08M Starter Kit.
An affordable tool, with a simple and fast learning curve, specially developed to allow the user to program an entire microcontroller in a determined manner, and also to consolidate without traumatic efforts the knowledge and experience necessary to undertake more complex developments.
There are two ways to design an electronic circuit to respond to the operation commanded by an application. Using in its development only conventional components without programming, or using programmable hardware.
Although, strictly considering it, this definition would be correct, at present the conjunction of software and hardware is indissoluble in the production of viable and competitive electronic applications.
In contrast to a standard design, a development based on a microcontroller allows full customization of the desired functions, allows a greater number of versions of operation, can integrate a higher degree of complexity, and reduces the number of components needed in the circuit, lowering the cost, risk of breakdown and production time.
The main drawback of a microcontroller is its complexity, and of all of it, programming under complex languages such as assembly code is probably the main one.
To avoid this handicap and to spread the use and adoption of the microcontroller at all levels, a type of product has become popular, the Picaxe family. It is a complete series of microcontrollers from Microchip, with their translation into the corresponding PIC models. The difference and advantage over the standard microcontroller model is that programming is eliminated as an element of complexity.
They do this by adopting the pseudo Basic language as an interpreter with the compiler and by making programming remarkably simple, even in some respects almost intuitive. Other firms, such as Cebek, have also proposed to solve the rest of the complex aspects associated with the microcontroller, eliminating all excuses or reluctance through a series of affordable kits solved independently with all the necessary elements for experimentation.
Dimensioned for a linear and simple learning, this type of product ensures from the beginning, even in the case of a beginner, the creation of the first programs and the full functionality of the microcontroller.
Learn with the Cebek EDU-AXE003U.
The Picaxe-08M2 or Cebek EDU-AXE003U Starter Pack is a starter kit for the Picaxe 8M08 2-pin microcontroller, especially suitable for those who have had little or no contact with microcontrollers. For neophytes, the EDU-AXE003U is an exceptional tool, although it does not prevent the uninitiated user from having to undertake it with a certain dedication and patient attitude before beginning to consider the first tests with the kit.
First you should look at the documentation and get a conceptual idea of what the hardware and software elements of the pack are and how they interact with each other. Without any precedent, or without being under the tutelage of a teacher, the feeling when opening the box is: "and now what?".
This article becomes aware of the guide and will describe Cebek's Starter pack 08M2, analyzing it as a product but also, and especially for those who want to start, in an informative way.
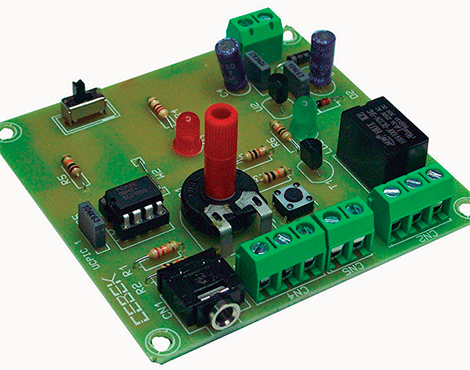
The EDU-AXE003U comes in a compact box. Inside are the elements for mounting the "motherboard", printed circuit and components ready to be soldered. Also the special cable for communication with the computer, for USB connection, and a CD with the necessary software and manuals.
"And now that?".
Among the advantages of the kit, and of the Picaxe range in general, is the abundance of information, application examples, and related support. From the documentation collected on the CD, or from the main web page, although obviously in English, you can easily access guides and initial examples of basic, medium and advanced complexity. Together, a collection of information structured so that the user can make a progressive and continuous progress without obstacles.
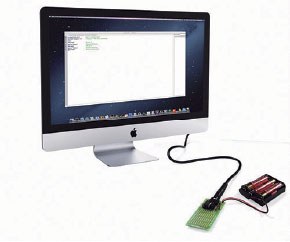
However, after opening the EDU-AXE003U in the first steps of the novice user, a single piece of information is necessary, without distractions, that is simple and that allows an immediate idea of the work process that must be used in the kit until programming is achieved. of the microcontroller. A process that can be summarized synthetically as shown in the following illustration.
The first step is to assemble the main module or "Mother Board". To do this, the few components required by the product must be welded. With the help of the assembly sheet that comes with the kit, and the screen printing of the printed circuit, and without any SMD element that could complicate it, the soldering process is solved easily and quickly.
Once the assembly of the circuit is finished, the attention is focused on the computer with which it is desired to work. The next point will be the installation of the driver or driver of the communication cable AXE027, included with the kit. The AXE027 cable, even with a USB end for the computer, is not a conventional model. Inside it is housed electronics that allow interpreting and establishing serial communication between the microcontroller and the computer. For this interface to be established, it is essential to previously install the necessary drivers on the computer.
The installation program is available for the three main versions of operating systems: Windows, OSX or Linux. It can be loaded directly from the CD or preferably, if there is a more recent version, from the Picaxe website: http://www.picaxe.com/Software/Drivers/AXE027-USB-Cable-Driver#tResources.
The penultimate step is the installation of the development software, with which the programs and the reading or writing of the microcontroller memory will be carried out. It is precisely at this point that the Starter Pack Picaxe-08M2 offers other of its most notable advantages. The user will be able to choose between different development tools, with a greater or lesser number of presentations and except for some specific tool such as the simulation of operation for electrical diagrams or programming through flowcharts, the rest are completely free.
The advantage is double in our case. In the laboratory we have Windows, OSX and Linux computers. Depending on where we are, we use one or the other computer. The Cebek kit allows the use of the same development tool, the "AXEpad" software, with a version for each of them and with the same interface and operating mode regardless of the operating system on which it runs. Also counting on full compatibility between program files made with one or another computer.
The AXEpad can be installed directly from the product CD or from the Picaxe website: http://www.picaxe.com/Software.
The fourth and final step is the circuit connections. Food and communication.
To power the Motherboard, the box for 3 AA batteries in series, which includes the kit, can be used, connecting it through the connection terminals of the circuit. Or instead, if preferred, a laboratory source adjusted between 4,5 and 5 VDC can be used, applying it directly to the power connection terminals.
The communication between the computer and the circuit is solved by connecting both through the AXE027 cable. USB connector to the computer and «Jack» type connector to the circuit. Finally, once the power supply and communication have been completed, the module will be ready to work.
The circuit.
In microcontroller development, the Motherboard is a specific development circuit, primarily intended for writing or reading the memory of the microcontroller. Subsequently, the microcontroller is assigned to a different board.
In addition to the motherboard, there are other circuits dedicated to development, such as the «Proto Board» or the trainer that allow the operation of the electronic prototype to be tested «in situ», which will later be mounted on a definitive commercial board. In the EDU-AXE003U the circuit can perform both functions. The initial assembly soldering focused only on one part of the circuit, leaving it ready to operate as a motherboard. The rest of the circuit is intended to operate as a "proto board" or trainer, making it possible to test the programs directly on a prototype.
The Picaxe 08M2 has five ports that can be programmed as inputs, outputs, analog ports, or other functions that the microcontroller supports. Each port is assigned to a pin/pin on the IC. Port 0 is located on pin 7; port 1 on pin 6; port 2 on pin 5; port 3 on pin 4 and port 4 on pin 3. The rest of the pins fulfill functions not intended for programming, such as negative and positive power supply, or used for serial communication with the computer.
Internally, the EDU-AXE003U has each of the five ports connected, in addition to the positive and negative power supply to the part of the circuit intended for testing. In this section, there are also a series of moles interconnected with each other, but without connection to the rest, and that make it possible to weld external components that, depending on how the connection between moles is designed, will allow the preparation of a test prototype connected directly to the micro . (Figure 3)
The first program
Before beginning to learn instructions and structures of the programming language, it is preferable to plan a practice that will serve as an introduction and contact with all the software and hardware. We have chosen a «Positioning light» as the first program, since as we will see below, the necessary electronics are very simple, reducing the assembly of the prototype and serving at the same time to leave it mounted as an optical indicator in more complex programs.
In addition, the software will also be simple. A Light or positioning witnesses are those that we will normally remember for having seen them in the highest part of buildings, the upper end of telecommunication antennas, etc. Its operation is cyclical but asynchronous, with a constant cadence where the lighting time and the shutdown time are different. To carry out the practice, a led, a limiting resistor and a micro port (microcontroller) will suffice. Applying ohm's law, for a voltage of 4,5 – 5 V. and a consumption of the LED over 15 mA, a resistance of 330 ohms will be adequate. From the micro pin, the resistor in series with the LED can be referred to negative or positive. We, to facilitate the logic of operation, refer to negative. So in binary, when programming a 1 in the output, the LED will light up. While sending a 0 to the micro output, the LED will turn off. Otherwise, an inverted logic would be established.
If the electrical diagram is observed, the construction of the prototype on the board will consist of joining the resistor with one of the moles marked as port 1. The other end of the resistor, using an independent line, must be connected to the anode of the led, and the This cathode, creating a bridge, can be joined with any of the moles internally connected to the negative. (Figure 4)
After the assembly of the prototype it is time to start programming. The AXEpad is a development tool, an editor for the programming of Picaxe micros, clear, simple, but totally solvent. The first time it is executed, we will find a window divided into two sections, the largest for the editor and the smallest for viewing the labels, constants or records that we create during programming. The editor behaves like any other development tool. As an instruction, a value, a comment, etc. is typed, the text will appear in a color that will identify what type of data it is, facilitating the programmer's task. Debugging is sequential, so each line will correspond to an instruction.
The AXEpad menu does not present any complications either. In addition to the File menu, with the typical functions of saving the document, loading or creating a new one, etc., or the Edit menu, also with the usual functions of any program, we will find two specific AXEpad menu options. The PICAXE menu, mainly focused on programming work and on the mic, contains the option to dump the program and save the mic's memory; debugging; the syntax checker, etc. The last option of the main menu corresponds to the screen display options and the access to the program options. The first line of the «Positioning Light» practice program will be a «Label or Label». The function of labels is to tell the program where to go when named. There can be as many as required, although the larger their number, the more complicated it can be to follow the flow of the program. In our case it will be the only one and since it is the main label, we will call it “main”. The second line of the program will be a port command. «High» is an instruction that sets the indicated port to a high level, (binary 1), in our practice port 1. By having the LED circuit connected to this port, this instruction will cause the LED to light up.
The third line of the program forces the micro to pause and therefore keep the previous order in effect. The "pause" instruction is set in milliseconds. The fourth line of the program sets port 0 low (binary 1) using the "Low" instruction. Thus, the LED will turn off. The fifth line executes a pause that will be maintained for 3 seconds, after which the 6th and last line of the program will be executed. The "Goto" instruction, followed by the name of the label, tells the microcontroller that should go to main. Thus the program will automatically repeat the cycle from the beginning, creating a closed and constant loop of the program. (Figure 5)
Positioning light.
Before sending the program created for practice to the micro's memory, it will first be necessary to check that the circuit jumper is in the «PROG» position, otherwise communication will not be established. It will also be time to check that the power and connection of the circuit with the computer is adequate. Returning to the AXEpad, through the PICAXE menu or through the keyboard shortcut «F5», the dump of the program is executed on the microcontroller. After the order, the software itself checks which Picaxe model it is and asks us for the microcontroller model if it does not match the one established in the program options.
This parameter can also be manually changed at any time through the Program Options.
During the transmission between the computer and the motherboard, a screen will be displayed indicating the process. If everything concludes successfully, the process screen will disappear to give way to another that will confirm and conclude the recording operation. The result on the prototype will be visible almost immediately after the confirmation screen.
It will start when the LED lights up for 1 second, then it will remain off for 3 seconds, turning on and off again at the same rate constantly until the power is removed. The first programming of the microcontroller will be completed.
Obviously it is an easy and basic practice, but it clearly illustrates the way of working and the type of instructions of the Picaxe language and the Cebek Starter Packs. Following the course of the documentation, there are a large number of practices and examples from the manufacturer, both of the electronics and of the corresponding program, focused on reaching from the previous practice and gradually a higher degree of complexity, in a smooth progression curve. and well defined until achieving the maximum performance and functions provided by microcontrollers.
Conclusions.
Cebek's Starter Pack Picaxe-08M is a great solution for novice users but also for those who are not so new. Herein lies its main strong point. The EDU-AXE003U assembles quickly, has software that runs on any of the main operating systems. The documentation is structured considering a progressive and very simple learning curve. If you have programmed in any language before, even if only at the computer level, an intuitive knowledge quickly establishes itself. The most advanced users will adapt faster to this than to any other microphone other than the one they are used to.
In short, the Cebek The EDU-AXE003U or Starter Pack Picaxe-08M is reminiscent of the didactic solutions for initiation to robotics or for the knowledge of alternative energies that the same house also distributes, but this time establishing the focus of interest on electronics more current. A product with a basic appearance but that almost without wanting it leads the user to a complete knowledge of the matter it deals with. Beneath its apparent simplicity, the EDU-AXE003U hides a sufficiently powerful microcontroller, which offers a considerable number of features and with which developments of a considerable degree of sophistication can be carried out. A product that is also economical, which justifies the investment if only for the motivation and ease of progression that it impresses on the user.


